
How to Make Herb Infused Oils: A Comprehensive Guide
Have you ever dreamt of capturing the vibrant essence of your garden herbs, bottling their flavors and aromas to elevate your culinary creations or soothe your skin? Infusing oils with herbs is a simple yet transformative process, unlocking a world of possibilities from gourmet cooking to natural skincare. This guide will walk you through everything you need to know to confidently create your own exquisite herb-infused oils at home.
Why Infuse Oils with Herbs?
Infusing oils with herbs is more than just a culinary or cosmetic technique; it's a way to connect with nature, preserve the fleeting beauty of your garden, and unleash your creativity. Here’s a deeper look at the benefits:
- Flavor Enhancement: Herb-infused oils add depth and complexity to your dishes. Imagine drizzling a rosemary-infused olive oil over roasted vegetables, or using a chili-infused oil to spice up a stir-fry. The possibilities are endless.
- Aromatic Therapy: Many herbs have therapeutic properties that can be extracted into oil. These oils can be used for massage, aromatherapy, or added to bathwater for a relaxing and rejuvenating experience.
- Natural Skincare: Herb-infused oils are excellent for moisturizing and nourishing the skin. Calendula-infused oil, for example, is known for its soothing and anti-inflammatory properties.
- Preservation: Infusing herbs in oil is a fantastic way to preserve their flavors and aromas beyond their growing season. It allows you to enjoy the taste of summer herbs throughout the year.
- DIY Beauty: Infused oils are a key ingredient in many DIY beauty products, allowing you to create your own personalized lotions, creams, balms, and soaps.
- Gifting: Homemade herb-infused oils make thoughtful and unique gifts for friends and family. Beautifully packaged, they show you put in personal effort.
Choosing Your Herbs: A Gardener's Palette
The first step in creating herb-infused oils is selecting the right herbs. Fresh, high-quality herbs will yield the best results. Consider these popular options:
- Rosemary: Known for its robust, piney aroma, rosemary-infused oil is excellent for roasting meats and vegetables.
- Thyme: With its earthy and slightly lemony flavor, thyme-infused oil pairs well with poultry, fish, and Mediterranean dishes.
- Basil: This classic herb infuses oil with a sweet and peppery flavor, perfect for Italian cuisine and salads.
- Mint: Refreshing and invigorating, mint-infused oil can be used in desserts, beverages, and even skincare products.
- Oregano: A staple in Mediterranean cooking, oregano-infused oil adds a bold and savory flavor to sauces, pizzas, and grilled meats.
- Garlic: For a pungent and savory oil, infuse garlic cloves along with your chosen herbs. Be extra cautious about potential botulism, which we will cover later.
- Chili Peppers: Add a fiery kick to your dishes with chili pepper-infused oil. Use caution when handling chili peppers and avoid touching your eyes.
- Lavender: Known for its calming and relaxing properties, lavender-infused oil is ideal for aromatherapy and skincare.
- Calendula: This vibrant flower infuses oil with soothing and anti-inflammatory properties, making it excellent for treating skin irritations.
- St. John's Wort: Used traditionally for its mood-boosting and skin-healing benefits. Consult with a healthcare professional before using.
Beyond this list, feel free to experiment with other herbs from your garden. Consider the flavor profiles you enjoy and the potential uses of the infused oil.
Growing Your Own Herbs: The Ultimate Freshness
While you can certainly purchase herbs from the store, growing your own ensures the highest quality and freshest flavor. Starting an herb garden is easier than you might think, and it provides a continuous supply of ingredients for your culinary and crafting adventures.
**Sunlight:Most herbs need at least 6 hours of sunlight per day.
**Soil:Well-drained soil is essential for healthy herb growth.
**Watering:Water regularly, but avoid overwatering.
**Harvesting:Harvest herbs in the morning, after the dew has dried, for the best flavor.
Choosing Your Oil: The Foundation of Flavor and Therapy
The type of oil you choose will significantly impact the flavor, aroma, and shelf life of your infused oil. Here’s a guide to common oil selections:
**Olive Oil:A classic choice for culinary infusions, olive oil offers a rich flavor and a relatively long shelf life. Opt for extra virgin olive oil.
**Avocado Oil:With its mild flavor and high smoke point, avocado oil is a versatile option for both cooking and skincare.
**Sunflower Oil:A neutral-flavored oil with a light texture, sunflower oil is a good choice for infusions where you want the herb's flavor to shine.
**Safflower Oil:Similar to sunflower oil, safflower oil has a mild flavor and a high smoke point, making it suitable for cooking.
**Grape Seed Oil:Another light and neutral oil, grape seed oil is rich in antioxidants and is often used in skincare products.
**Coconut Oil:Solid at room temperature, coconut oil adds a distinct flavor and aroma to infusions. It is best suited for skincare and massage oils. Fractionated coconut oil remains liquid.
**Jojoba Oil:Technically a liquid wax, jojoba oil is excellent for skincare due to its similarity to human sebum. It is easily absorbed and has a long shelf life.
**Almond Oil:A light and nourishing oil, almond oil is often used in massage oils and lotions.
Consider the intended use of your infused oil when selecting an oil. For culinary purposes, olive oil, avocado oil, or sunflower oil are excellent choices. For skincare, consider lighter oils like almond, grapeseed, or jojoba oil.
Methods of Infusion: Heat vs. Cold
There are two primary methods for infusing oils with herbs: the heat method and the cold infusion method. Each method has its advantages and disadvantages.
The Heat Method: Speed and Intensity
The heat method involves gently heating the oil and herbs together, which speeds up the infusion process and extracts more flavor and aroma quickly.
**Instructions:**
1. **Prepare the Herbs:Wash and thoroughly dry your herbs. Moisture can lead to spoilage.
2. **Combine Ingredients:In a saucepan, combine the herbs and oil. Use a ratio of approximately 1 cup of oil to 1/2 cup of fresh herbs.
3. **Heat Gently:Heat the mixture over very low heat, ideally between 100°F and 120°F (38°C – 49°C), for 1 to 5 hours. Use a thermometer to monitor the temperature. The goal is to gently warm the oil, not to fry the herbs. The longer you heat, the more intense the flavor, but be careful not to burn the herbs.
4. **Cool and Strain:Allow the oil to cool completely before straining it through a fine-mesh sieve lined with cheesecloth. This will remove any herb particles.
5. **Store Properly:Pour the infused oil into a clean, airtight container and store it in a cool, dark place.
**Pros:**
Faster infusion time
More intense flavor and aroma
Suitable for tougher herbs like rosemary and thyme
Discover Proven Techniques to Preserve Your Food Year-Round and Enjoy Less Waste with More Freshness
**Cons:**
Risk of overheating and damaging the oil or herbs
Can degrade delicate flavors of some herbs
Requires close monitoring
The Cold Infusion Method: Gentle Extraction
The cold infusion method involves steeping the herbs in oil at room temperature for a longer period. This method is gentler and preserves the delicate flavors and aromas of the herbs.
**Instructions:**
1. **Prepare the Herbs:Wash and thoroughly dry your herbs.
2. **Combine Ingredients:Place the herbs in a clean glass jar and cover them completely with oil. Use a ratio of approximately 1 cup of oil to 1/2 cup of fresh herbs. Crush the herbs slightly to release their oils.
3. **Infuse:Seal the jar tightly and store it in a cool, dark place (like a pantry) for 2 to 6 weeks. Shake the jar gently every few days to ensure even infusion.
4. **Strain:After the infusion period, strain the oil through a fine-mesh sieve lined with cheesecloth.
5. **Store Properly:Pour the infused oil into a clean, airtight container and store it in a cool, dark place.
**Pros:**
Gentle extraction preserves delicate flavors and aromas
Less risk of damaging the oil or herbs
Simple and requires minimal monitoring
**Cons:**
Longer infusion time
Flavor may be less intense compared to the heat method
Higher risk of spoilage if herbs are not completely dry
Step-by-Step Guide to Making Herb Infused Oil
Let’s walk through the process of making herb-infused oil, using the cold infusion method as our primary example.
**Materials You’ll Need:**
Fresh herbs (about ½ cup packed for every 1 cup of oil)
High-quality oil (olive, avocado, sunflower, etc.)
Clean glass jar with a tight-fitting lid
Fine-mesh sieve
Cheesecloth
Funnel (optional, but helpful)
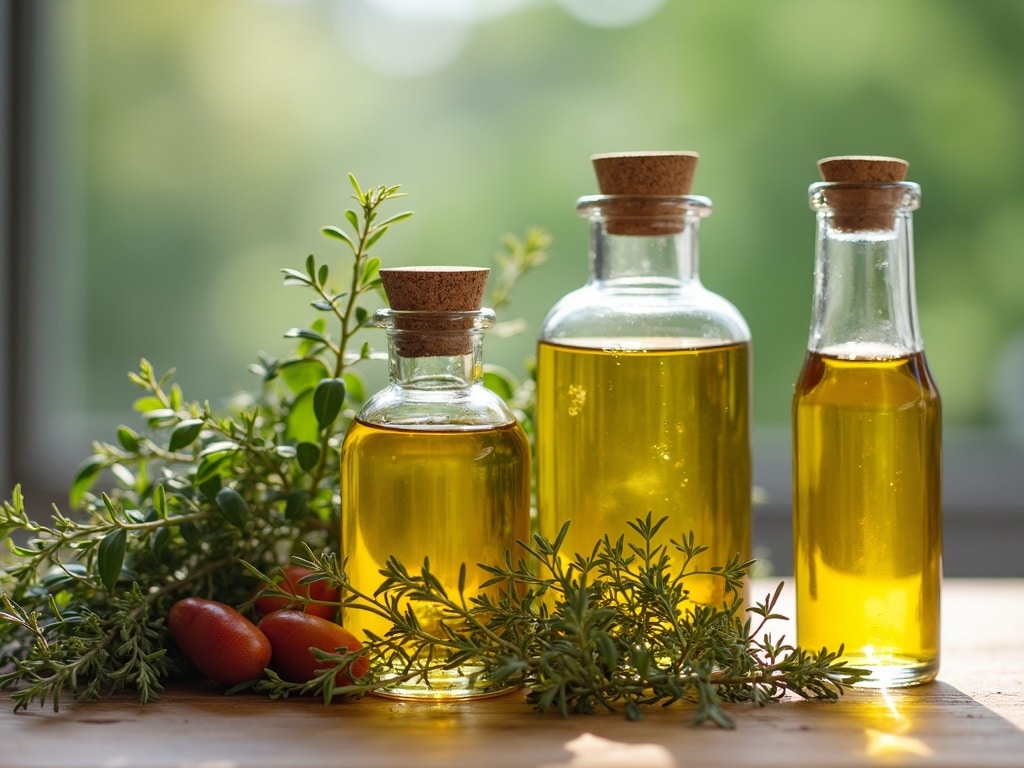
Dark glass bottles for storage
**Instructions:**
1. **Gather Your Herbs:Harvest fresh herbs from your garden or purchase them from a reputable source. Choose herbs that are free from blemishes and signs of disease.
2. **Wash and Dry the Herbs:Gently wash the herbs under cool running water to remove any dirt or debris. Pat them dry with a clean towel or use a salad spinner to remove excess moisture. It is crucial that the herbs are completely dry before infusing them in oil. Excess moisture can lead to mold growth and spoilage. Spread the herbs on a clean towel or wire rack and allow them to air dry for several hours, or even overnight.
3. **Prepare the Jar:Sterilize the glass jar and lid by washing them in hot, soapy water and then rinsing them thoroughly. You can also place the jar and lid in a boiling water bath for 10 minutes to ensure they are completely sterilized. Allow the jar and lid to air dry completely before using them.
4. **Combine Herbs and Oil:Place the dried herbs in the sterilized jar. Gently crush the herbs with a wooden spoon or your fingers to release their oils. Pour the oil over the herbs, making sure they are completely submerged. Leave about ½ inch of headspace at the top of the jar.
5. **Seal and Infuse:Seal the jar tightly with the lid. Label the jar with the date and the type of herb you are using. Store the jar in a cool, dark place for 2 to 6 weeks.
6. **Shake Regularly:Shake the jar gently every few days to ensure even infusion. This will help the herbs release their flavors and aromas into the oil.
7. **Strain the Oil:After the infusion period, strain the oil through a fine-mesh sieve lined with cheesecloth. This will remove any herb particles. Squeeze the cheesecloth to extract as much oil as possible.
8. **Bottle and Store:Pour the strained oil into clean, dark glass bottles. Dark glass helps to protect the oil from light, which can degrade its quality. Seal the bottles tightly and label them with the date and the type of herb. Store the infused oil in a cool, dark place for up to 6 months.
Safety First: Preventing Botulism
When infusing oils, especially with garlic or other low-acid ingredients, it’s crucial to take precautions against botulism, a rare but serious form of food poisoning. *Clostridium botulinumbacteria can thrive in anaerobic (oxygen-free) environments like oil, producing a dangerous toxin.
**Here’s how to minimize the risk:**
**Use Fresh, Clean Ingredients:Start with the freshest herbs and garlic, free from any signs of spoilage.
**Acidify Garlic:If using garlic, consider acidifying it by soaking the peeled cloves in a solution of 3% acidity vinegar (like white vinegar or apple cider vinegar) for at least 24 hours before infusing. This lowers the pH and inhibits botulism growth.
**Dry Herbs Thoroughly:Ensure herbs are completely dry before infusing to prevent water activity that can promote bacterial growth.
**Refrigerate Garlic-Infused Oils:Always store garlic-infused oils in the refrigerator, even after straining. This significantly slows down any potential botulism production.
**Heat Treatment (Optional):For added safety, especially with garlic, you can heat the infused oil to 250°F (121°C) for 10 minutes to kill botulism spores. However, this can affect the flavor of the oil and herbs. This is generally not recommended for home cooks.
**Discard if Suspect:If you notice any signs of spoilage, such as a foul odor, cloudiness, or bulging of the bottle, discard the oil immediately. Do not taste it.
**Use infused oils quickly:Consume homemade herb infused oils within 2-3 weeks, especially garlic-infused ones.
By following these safety guidelines, you can enjoy your homemade herb-infused oils with peace of mind.
Creative Uses for Your Herb Infused Oils
Now that you've crafted your own fragrant and flavorful herb-infused oils, it's time to unleash your creativity. Here are just a few ideas:
**Culinary Uses:**
**Drizzling:Drizzle infused oils over salads, roasted vegetables, grilled meats, or fish.
**Marinades:Use infused oils as a base for marinades to add flavor and moisture to meats and vegetables.
**Dips:Create delicious dips by combining infused oils with balsamic vinegar, herbs, and spices.
**Bread Dipping:Serve infused oils with crusty bread for a simple and elegant appetizer.
**Pasta Sauces:Add infused oils to pasta sauces for an extra layer of flavor.
**Pizza:Drizzle infused oil over pizzas before or after baking.
**Stir-fries:Use infused oils to stir-fry vegetables, meats, or tofu.
**Soups:Add a finishing touch to soups with a swirl of infused oil.
**Eggs:Use infused oils to scramble eggs or make omelets.
**Skincare and Aromatherapy Uses:**
**Massage Oils:Use infused oils as massage oils to soothe sore muscles and promote relaxation.
**Bath Oils:Add a few drops of infused oil to your bathwater for a luxurious and aromatic experience.
**Moisturizers:Apply infused oils directly to the skin as a moisturizer.
**Hair Oils:Use infused oils to nourish and condition your hair.
**Aromatherapy:Add a few drops of infused oil to a diffuser to create a relaxing and aromatic atmosphere.
**DIY Beauty Products:Incorporate infused oils into homemade lotions, creams, balms, and soaps.
**Cuticle Oil:Use infused oils to moisturize and strengthen your cuticles.
**Gifting Ideas:**
**Create a Gift Basket:Combine several different herb-infused oils with other gourmet items, such as balsamic vinegar, artisan bread, and cheeses, to create a unique and personalized gift basket.
**Package Beautifully:Pour the infused oil into decorative glass bottles and label them with elegant tags. Tie a ribbon around the bottle neck for a finishing touch.
**Include a Recipe Card:Include a recipe card with suggestions on how to use the infused oil.
Troubleshooting Common Problems
Even with careful preparation, you might encounter some challenges. Here's a quick troubleshooting guide:
**Cloudy Oil:Cloudiness can be caused by moisture or sediment. Ensure herbs are completely dry and strain the oil thoroughly. You can also try refrigerating the oil, which will cause the sediment to settle.
**Mold Growth:Mold growth indicates that the herbs were not properly dried or the jar was not sterilized. Discard the oil immediately and start over with fresh, dry herbs and a sterilized jar.
**Rancid Oil:Rancidity is caused by oxidation. Store infused oils in a cool, dark place in tightly sealed containers to prevent oxidation.
**Weak Flavor:A weak flavor indicates that the herbs were not potent enough or the infusion time was too short. Use fresh, high-quality herbs and extend the infusion time.
Beyond the Basics: Advanced Techniques
Once you've mastered the basic techniques, you can explore some advanced methods to take your herb-infused oils to the next level.
**Multiple Herbs:Combine multiple herbs to create complex and unique flavor profiles.
**Spice Infusions:Add spices like peppercorns, chili flakes, or star anise to your herb infusions.
**Citrus Zest:Infuse citrus zest along with your herbs for a bright and refreshing flavor.
**Sun Infusion:Place the jar of herbs and oil in direct sunlight for several hours each day to speed up the infusion process. However, be careful not to overheat the oil.
**Vacuum Sealing:Use a vacuum sealer to remove air from the jar during the infusion process. This can help to prevent oxidation and extend the shelf life of the oil.
Embrace the Art of Infusion
Making herb-infused oils is a rewarding and creative process that allows you to capture the essence of your garden and elevate your culinary and skincare creations. With a little practice and experimentation, you can create a collection of unique and flavorful oils that will delight your senses and enhance your well-being. So, gather your herbs, choose your favorite oil, and embark on this aromatic adventure. Your senses will thank you.